Photobucket Photobucket Photobucket Photobucket
Showing posts with label beef. Show all posts

Saturday, August 20, 2011

Make your own Frozen Meatballs


I know right? Doesn't that look all sorts of delicious? This is one of my favorite bed rest freezer meals. I have a giant ziploc bag full of mini meatballs in my freezer right now. Hmm, the possibilities. I can serve them with spaghetti, shells, swedish meatballs over noodles, meatball subs, BBQ meatballs over rice, or even sweet and sour meatballs. They are fully cooked, so a quick zap in the microwave is all they need before you add them to the sauce. They taste amazing and I loaded them up with veggies. I've found that if I chop all the veggies really small my little man doesn't notice. I shred spinach really fine, or grate the carrot on the smallest size on my cheese grater. Love these!

Husband Rating: 5 stars

3 lbs ground beef or turkey
1 large onion, finely chopped
1/2 cup parmesan cheese
4 cloves garlic
2 tsp. garlic salt
3 eggs
1 tsp. pepper
1/2 cup bread crumbs
1/4 cup ketchup
1/2 pkt. onion soup mix
2 of any of the following veggies, minced or finely chopped, 1/3 cup: carrot, zucchini, spinach, green pepper, mushrooms

Combine all the ingredients and stir until smooth. Shape into 1 inch meatballs. Line pan with foil and arrange meatballs. Bake at 400* for 20 minutes. Makes 80 mini meatballs.

To freeze: After the meatballs cool you need to flash freeze them. This freezes each one individually so you don't end up with a giant glob of meatballs stuck together. Sometimes you only need 7-10 from the bag for dinner. Arrange the meatballs flat on cookie sheet and put in your freezer for about 2 hours. Then, put them in your ziploc bag for storage.

To reheat, I just put them in a microwave safe bowl and nuke for about 1 minute. If I'm using them in spaghetti, I just add them frozen right into the sauce and let them simmer with the sauce.


Here is some extra incentive for you to line the pan with foil instead of just cooking spray. What a mess!

What else do you make with meatballs? Hmm, I bet there is some soup that would be good with them too...

post signature

Thursday, November 11, 2010

The Search is Over and Steak Paprika


*Insert cheesy 80s mix tape*

"And I'm never gonna let you go, I'm gonna hold you in my arms forever . . . . "

That's right folks, the search is over! I'm so delighted! I have finally, after years of frustration, found the perfect dishwasher soap. I've just been dealing with white spots, film, flakies, globs and smeared dishes forever, and now my search is over. Dishwasher detergent is expensive, and I've tried every brand on the Target shelves believing their grease fighting promises only to be disappointed. New soap, amazing! Smells good, cleans great, no gunk and here's the kicker - child safe! Yeah, no dangerous warning on the back, all natural and affordable. Can you guess what brand it is? If you want to know more, email me or leave a comment w/ your email and I'll let you in on the secret. Rejoice!

And since my dishwasher can handle every crusty dish I put in there, let me share this fabulous recipe with you. My husband loves this steak over pasta dish, and the paprika makes it spicy good. You could serve it over rice, but penne pasta is my fave. Don't go skimpy on the mushrooms, they "make" this dish in my opinion.

Husband Rating: 5 stars

Father-in-law stamp of approval recipe

2-3 Tbsp. butter

4 4oz. flank steaks

1 cup sliced mushrooms

4 Tbsp. diced onion

2 cloves garlic, minced

2 tsp. paprika

2 Tbsp. flour

1/2 cup sour cream

1 cup beef broth

3 cups cooked pasta

Dash of black pepper

Cook pasta according to package directions. Melt butter over medium heat in a skillet. Cook steaks in butter 5-7 minutes, or until desired doneness. Remove steak, but save the drippings in the pan. In drippings saute mushrooms, onion and garlic. Stir in paprika and dash of pepper. When mushrooms are tender stir in beef broth, and stir over medium heat for 2 minutes. In a separate bowl stir together flour and sour cream. Whisk in to pan and stir until smooth. Slice steak into thin strips. Pour mushroom sauce over noodles and top with sliced steak. Enjoy!


Linking up with Foodie Friday, Friday Favorites, and Show off your Stuff Party

post signature

Wednesday, September 15, 2010

Baked Ziti (with freezer directions)


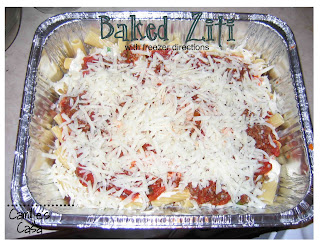
First off, I am finally getting around to posting this recipe for my friend Kari. (Why for some reason do I have so many friends named Kari anyway? This is my Provo Kari!) I've made this like 4 times since I discovered the recipe and it is so delicious fresh or from frozen. Above is my pan ready to go in the freezer, below you will see the piping hot pile of delicious pasta. My favorite Baked Ziti recipe comes from Freeze Happy, click for the original, below has my changes. It's easier than lasagna, fancier than spaghetti and you can load this baby up with vegetables!

Note: This recipe makes either 1 large 9x13 pan or 2 8x8 dishes. I always bake one 8x8, and then assemble and freeze the other for later. You can easily double or triple and fill your freezer. Yum!

Husband Rating: 5 stars

8 oz. ground beef
2 cloves garlic
1/4 cup diced onions
1/4 cup diced mushrooms
1/4 cup diced green pepper
3 Tbsp. Parmesan cheese
1 jar spaghetti sauce
1 lb box of ziti (or rigatoni) noodles
8 oz. cream cheese
1/2 cup sour cream
1 egg
6 green onions
1 1/2 cups mozzarella cheese

Cook noodles according to package directions, do not overcook or they'll be mushy when you freeze. In a skillet over medium heat cook ground beef until no longer pink. Add in minced garlic, diced onions, mushrooms and green pepper. Stir in spaghetti sauce, cook and stir for 4-5 minutes. In a mixing bowl stir together cream cheese, sour cream, egg, parmesan cheese and diced green onions until smooth. In your baking dish layer noodles across the bottom, spread white cream cheese layer over the top, then pour red sauce over the top. Sprinkle with mozzarella cheese. Bake at 350* for 20 minutes covered, and 10 minutes uncovered.

To freeze, cover with foil, label, date and freeze. Use within 3 months. If you want to thaw your ziti, put it in the fridge the night before and bake at 350* for 20 minutes covered and 10 minutes uncovered. If the ziti is frozen, bake at 350* for 50 minutes covered and 30 minutes uncovered.

post signature

Wednesday, August 4, 2010

Beef Enchiladas (freezer version)


My husband loves enchiladas, especially his mom's homemade, authentic enchiladas. I usually avoid making those "my mom's best" meals because they just disappoint. But, enchiladas are so cheap to make and easy to freeze, I made the attempt. These turned out fantastic, really. The first time I made them I used a can of Old El Paso enchilada sauce in mild. I enjoyed it, but it really tasted like salty tomato sauce. The second time I used a can called Las Palmas, it was much spicier and had that authentic Mexican flavor. So, if you want the real enchilada flavor pick a can with a more Mexican looking label, lol, seriously. For our little family I made two 9x9 pans of 10 enchiladas each, a 9x13 pan would be perfect for you bigger families. Enjoy!

Husband Rating 4 1/2 stars (a 5 is reserved for mom's:)

1 pound ground beef

2 10 oz. cans enchilada sauce

1 8 oz. can tomato sauce

1 clove garlic, minced

1/4 cup diced onion

1 tsp. taco seasoning

2 cups cheese, grated

20 corn tortillas

In a large skillet brown ground beef until no longer pink. Add minced garlic and onion. Stir in 2 cans of enchilada sauce, tomato sauce and taco seasoning. Simmer on low for 15 minutes. Warm tortillas (I put them in the microwave for a few seconds to soften, you want them to roll without cracking). Use a slotted spoon to scoop beef mixture into tortillas. Put a spoon full in each tortilla, roll and line up in pan. Poor remaining sauce over the top of tortillas. Sprinkle with cheese. To bake immediately, cook uncovered at 350 for 15 minutes.

To freeze, cover with foil, label and date. To reheat, thaw over night in the fridge. Cook uncovered at 350 for 15-20 minutes or until bubbly and cheese is melted. Be sure to cook frozen enchiladas within 3 months.

Like I mentioned, I baked one for dinner and then froze the other pan for later. The pan that was frozen was dryer, but still delicious. If you want saucier enchiladas, I would recommend saving 1/2 cup or so of the sauce in a ziploc bag and freezing it with the pan. You could thaw it in the microwave and then spread it around before baking.

post signature

Wednesday, July 14, 2010

Navajo Tacos


You know those days where you have no money to go grocery shopping until payday - more than a week away? And you know you're going to be eating out of your pantry and freezer and try to be creative to make it delicious. Well, we're having one of those weeks, payday cannot come soon enough. Ironically, weeks ago I signed up to feed dinner to our church missionaries, lovely right? I didn't have enough chicken, beef or pork to make something nice, but c'mon, I'm Camille, I can't serve something lame and crappy, lol. I did stare into my pantry for a while before the idea hit me - navajo tacos!! I had 2 cans of chili, milk and eggs for the dough and enough toppings to squeak by, phew. And yes, it was so delicious the missionaries had no idea just how cheap the meal was:) Beats tuna casserole aye?

Note: I make my own dough for the scones, it just tastes so much better. I have friends that use rhodes frozen rolls, it saves time, but consider making your own using my Best Ever Bread Dough recipe, it's fool proof. One recipe made 16 giant scones, I stuck the extras in the freezer for another fast meal, or you could have the recipe for 8. Enjoy!

Husband and Missionary Rating: 5 stars

1 recipe of Best Ever Bread Dough

2 cans chili
1 1/2 cups shredded lettuce
1 cup cheese, grated
Diced tomatoes, olives, onions and your favorite toppings

Oil for frying


Separate your dough into 16 equal portions, they end of being about the size of tennis balls.

Roll out until flat. I like to make my scones thin, they cook faster and you don't run the risk of them being doughy in the middle.

Heat your oil to medium-high. Make sure the oil is heated before your drop in the first scone. Cook for about 2 minutes on each side, or until golden brown. Drain on a plate with paper towels.

Heat up chili (yay for the microwave) and assemble toppings.

Don't they look golden delicious? Mmm Mmmm! Scoop on your chili, then layer with cheese and other toppings. And yes, you're allowed to have seconds.

Linking up with Tempt My Tummy Tuesday at Blessed with Grace
and Idea Sharing Wednesday at Women Who Do It All

post signature

Tuesday, June 22, 2010

Cheesy Texas Bake


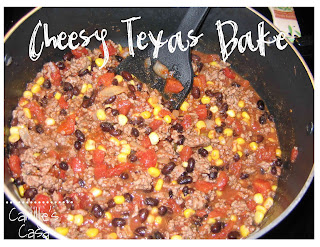
Sometimes I wish my camera was better at portraying the deliciousness of some food. This was hard to get a good picture of, but let me just say it is so gooey, cheesy, yummy, plate-lickin' good. This recipe makes either one 9x13 pan or two 8x8 pans. I always make one for dinner tonight, and one in the freezer for dinner later. You could get fancy schmancy and garnish this with green onions or cilantro and sour cream, but it's quite amazing all on it's own, I'm just sayin'.

Husband Rating: 4 1/2 stars

12 oz. ground beef
1 clove garlic
1/4 cup onion, diced
1 10 oz can Rotel diced tomatoes and green chilies (do not drain)
1 15 oz can black beans, rinsed
1 cup frozen corn
1/2 packet taco seasoning
1 8 oz. can tomato sauce
8 oz. cheese
2 boxes Jiffy cornbread mix (plus eggs and milk as called for on the box)

In a large skillet cook ground beef until no longer pink, drain any grease. Add onion and garlic. Stir in Rotel tomatoes, tomato sauce, black beans, corn and taco seasoning. Cook and stir for 5 minutes over medium heat.

Divide mixture equally between to 8x8 baking dishes. Sprinkle 4 oz. cheese over each dish. In a separate bowl make cornbread mixes according to package directions. Divide and pour over each pan, spreading to the edges. (Sometimes I make each package separately so I don't have to eyeball half, whatever works!)

Bake at 375, uncovered for 30-35 minutes or until cornbread is brown and filling is bubbly.


For your freezer pan, let it cool for a few minutes and cover with foil. Label and date, you'll need to use within 3 months.


Note: You don't bake the freezer version until you want to eat it!

To prepare freezer version: Remove from the freezer 30 minutes before cooking time. Let sit on the counter for 30 minutes, uncovered. Put foil back on and bake covered at 375 for 30 minutes. Remove foil and bake for an additional 45-50 minutes or until cornbread is golden brown and the filling is bubbly.


It's so good, trust me. We ate 3/4 of the pan that night, and then I sent the rest with my husband for lunch the next day. Whoohoo for double duty foods!

Linking up with Tempt My Tummy Tuesdays!
and Tuesdays at the Table at All the Small Stuff

post signature

Friday, June 11, 2010

Marinated Steaks (for your freezer)


Another freezer recipe, and this one's even better because you can make your husband cook it. Does your husband have dibs on the grill too? Honestly, I've never even lifted the handle the entire 3 years we've owned our grill. Any wonder why I like to grill all summer long? Hehehe, but it tastes so good he can't complain! Anyway, the key to making this recipe a success is buying the steak when it's a killer deal. Watch for cheap sales or buy one get one free on the steaks. I bought 9 steaks, and put them 3 to a bag. It cost about $6 for the meat. I put 3 steaks to a freezer bag. We grill all 3, then eat 2 for dinner and save the 3rd. For lunch the next day, slice it up with some red onions and you've got yourself some steak fajitas. Score!

Note: Yes, you could make your own delicious marinade here, but by using a Lawry's coupon from coupons.com I got these bottles for .68 cents each. 1 bottle is all you need, plus this is a really good marinade. I didn't have to add a clove of garlic or anything.

Husband Rating: 5 stars

9 steaks (your favorite cut)
1 bottle Lawry's Steak and Chop Marinade
3 freezer ziploc bags

Begin by scoring your meat. Make a tic-tac-toe pattern on your meat with the tip of the knife. Just glide the knife across, don't slice through the whole thing. This allows the marinade to sink into the meat and help tenderize. Can you see my score lines on this steak?

Divide your steaks into freezer bags and pour in marinade. I just used the entire bottle, but it could have gone further. Label and freeze flat. Don't forget to write the date, you'll want to use within 3 months.

To Cook: Take the bag of frozen steaks out of your freezer and place in the fridge the night before you want to grill them and let them thaw overnight. Heat your grill and cook steaks until your desired doneness. Be sure to discard bag and remaining marinade. Serve with your favorite summer vegetables.

You can serve your steak w/ a baked potato and corn, chop it up for a stir fry, or cut into chunks and combine with veggies for some delicious grilled kabobs!

Linking up with Life as a Mom Ultimate Recipe Swap!

post signature

Saturday, February 20, 2010

Thai Beef Ribbons and Creamy Red Potatoes


I even impressed my mother-in-law with this recipe, so you know it must be delicious! If you own metal skewers, perfect, if not purchase wooden skewers. They are about $2.50 for 100 skewers. Make sure you soak your skewers in water for about 30 minutes before you broil them. Mine turned black anyway, as you can see in the picture. To make cleanup a snap line your broil pan with foil.

Husband Rating: 5 starts
Mother-in-law Approved Recipe

4 beef flank steaks
2 tsp. ginger
2 cloves garlic, minced
2/3 cup teriyaki sauce
1 TB vegetable oil
1/4 tsp. red pepper flakes
1/2 tsp. sesame seeds
15-20 wooden skewers

Slice steak into long, thin strips. In a bowl combine ginger, teriyaki sauce, garlic, oil and red pepper flakes. Add steak and turn to coat. Let steak sit in marinade for at least 15 minutes. Thread each piece of steak onto a soaked skewer accordion style. Line beef ribbons up on broiler pan, about 3-4 inches from the heat. Broil 2-3 minutes on each side. Sprinkle with sesame seeds and serve.

Creamy Red Potatoes

8 red potatoes
3-4 TB milk
4 oz. cream cheese
1/2 tsp. garlic salt
1/2 tsp. parsley flakes

Scrub potatoes and chop in quarters. Place in pan cover with water. Turn on high until water boils, then reduce to medium heat. Cook for 15 minutes or until potatoes are soft. Drain water. Mash in milk, cream cheese and garlic salt. Add more milk if potatoes are too dry. Sprinkle with parsley.

Thursday, February 4, 2010

Soft Tacos


Mmm, soft tacos. This recipe is so easy to throw together and husband always enjoys. You can have fun with the toppings too; like if I have leftovers olives, green onions, guacamole, salsa or nacho cheese you can always dump it on top. I like to warm my tortillas up on a skillet so they are warm and crispy, versus the soggy microwave variety. I have pre-portioned chunks of ground beef in my freezer, so I just grab them out and put them right in the pan to cook. This meal requires no forethought - love that! And seriously, who doesn't love a soft taco?

Husband Rating: 4 stars

8 oz. ground beef
6 tortillas
2 Tbsp. taco seasoning
2 Tbsp. diced onion
Toppings: Lettuce, sour cream, diced tomatoes, grated cheese, salsa, etc.

Cook ground beef in a skillet over medium heat. Drain any grease. Stir in diced onion and taco seasoning. If dry, add 1 Tbsp. of water. Place a spoonful of taco meat in the center of a warmed tortilla and layer with toppings. Roll and serve.

post signature

Saturday, November 14, 2009

Beef Gorditas


These are a lot of fun to make and have endless possibilities. I used ground beef for the filling, but I'm thinking shredded chicken, shredded pork, heck even tuna fish or salmon would pass! I used pillsbury grands biscuits, but the generic brand would taste the same I'm sure. You could layer on so many veggies in gorditas. They are perfect for the picky eater too, since you can choose your own toppings. My favorite part of these gorditas is the melted cheese - yum!

Husband Rating: 3 1/2 stars

1 can refrigerated biscuits (yay Pillsbury! My can had 8)
4 TB cornmeal
1 cup cheese, shredded
1 cup beef (shredded or ground and seasoned)
1 cup shredded lettuce
Optional toppings: sour cream, salsa, hot sauce, onions, tomatoes, guacamole, black beans, rice, olives, jalepenos

Preheat oven to 375. Flatten each biscuit until about 5 inch round. Coat both sides of flattened biscuit with cornmeal. Place on an ungreased cookie sheet and bake for 10 minutes. Take out, sprinkle the tops with cheese, bake for 2 minutes longer or until cheese is melted. Top each biscuit with meat, veggies and sour cream. Fold in half to serve.

Monday, October 26, 2009

Gourmet Hot Dogs


It's time to spoil yourself a little and throw some gourmet dogs on the grill. Buy the best kosher beef dogs you can find, or use spicy smoked sausage. Slice them in half and grill until perfect. Get the fancy rolls (or make your own) and toast them too on the grill! I didn't take the picture after I loaded it, but cram as many delicious vegetables as you can on there. So messy and so amazing!

Husband Rating: 5 stars

Toppings we used:
Grilled mushrooms
Grilled onions
Ketchup
Mayo
Mustard
Lettuce
Diced tomatoes
Pickle relish
Jalapenos (him, not me)


Thursday, October 8, 2009

Pigs in a Blanket


My husband was expected for lunch in 15 minutes and I hadn't prepared anything. What to do?!!? Pigs in a blanket to the rescue! These were so easy, I was just pulling them out of the oven when he walked in. He walked up behind me and said, "Mmm, you went all out for lunch today. Thanks babe." Of course, I took the compliment and let him think he was getting extra special treatment. I have made these before with homemade bread dough, and of course they're delicious that way. For parties as an appetizer buy the little sausages and cut the crescent rolls into 3 pieces each. For an added flair you can wrap cheese around the dog before the dough, mmm. Enjoy!

Husband Rating: 4 stars

8 beef hot dogs
1 can Pillsbury Crescent Rolls (8 count)

Prehead oven to 375. Wrap each dog in a crescent roll. Place on a cookie sheet and bake for 12-14 minutes or until golden brown. Serve with ketchup and mustard.


Thursday, July 23, 2009

Easy Cheesy Manicotti


Every year I would have my beginning cooking high school students make this recipe. It was always a delicious smash-hit. I always gave extra credit to any kitchen group that didn't break a single manicotti noodle. The trick is to add cooking spray to the water while they're boiling and remove them just before they're done. String cheese makes this recipe a snap. I make another sausage and cheese-stuffed manicotti, but this one is perfect for beginners or kids.
This cheesy goodness can easily hide vegetables, I've added minced celery, zucchini and carrots to the sauce, husband unaware. Mushrooms and green peppers are also delicous, throw them in with the onions and garlic.

Husband Rating: 5 stars (and constant requests for dinner)

6 oz. ground beef (this is the amount of 2 card decks)
6 manicotti noodles
6 Mozzarella string cheeses
3 TB onion, diced
1 clove garlic, minced
3 oz. shredded cheese
1 jar meatless spaghetti sauce (ragu works great here!)
Italian Seasonings to taste

Preheat oven to 350. Boil manicotti noodles as directed on package, being careful not to break. In a skillet cook ground beef over medium heat until no longer pink, drain any grease. Add onions and garlic. Add in spaghetti sauce and season with Italian spices until perfect. Pour half of the sauce mixture into bottom of an 8 x 8 baking dish. Carefully stuff each manicotti noodle with a piece of string cheese. Line stuffed manicotti noodles into pan. Pour remaining sauce on top of manicotti. Cover with foil and bake for 30 minutes. Sprinkle with shredded cheese and bake 5 more minutes or until cheese is melted.

Linking up with Tempt My Tummy Tuesdays blog party!

Beef Stroganoff


*This is one of those recipes that my mom made all the time
and just the smell of it seems cozy and warm. I like to serve
this over rice, but pasta works too. I've been using half
brown and half white rice lately, hubby didn't even notice.
My mom would serve it with steamed carrots and peas and
it all mixes together on your plate and mmmmm.
Bring on the comfort food!
*Remember to add your sour cream at the end, you don't
want any curdling!

Husband Rating: 2 1/2 stars


6 oz lean ground beef
3 TB onions, diced
1/2 pkg. mushrooms, sliced
1/2 cup sour cream
1 can cream of mushroom soup
Dash of black pepper
2 cups hot, cooked rice

Brown ground beef in skillet over medium heat, drain any grease.
Add onions and mushrooms, cook and stir until tender. Add cream
of mushroom soup, stirring until smooth. Cook and stir for 5 minutes.
Turn off heat and mix in sour cream and dash of pepper. Serve over
warm rice and vegetables.

LinkWithin

Related Posts with Thumbnails